Account Administration
This guide covers all administrative features available to LeapFILE account administrators. Administrators have access to user management, account configuration, branding, reporting, and billing features.
Accessing Admin Features
To access administrative options:
- Log in to your LeapFILE web account
- Click the Account tab in the top menu
As an administrator, you'll have access to sections that regular users don't see.
Account Setup
Click Account Setup under the Account tab to configure account-wide settings.
Service Plan & Account Information
View details about your account:
- Service Plan: Current plan, signup date, and available features
- Account Information: Account name, administrator contact, and company details
General Account Settings
Transfer & Expiration Policies
File Delivery Options - Set maximum and default expiration periods for file transfers - Configure how long transfers remain available after sending - Default is typically 7 days
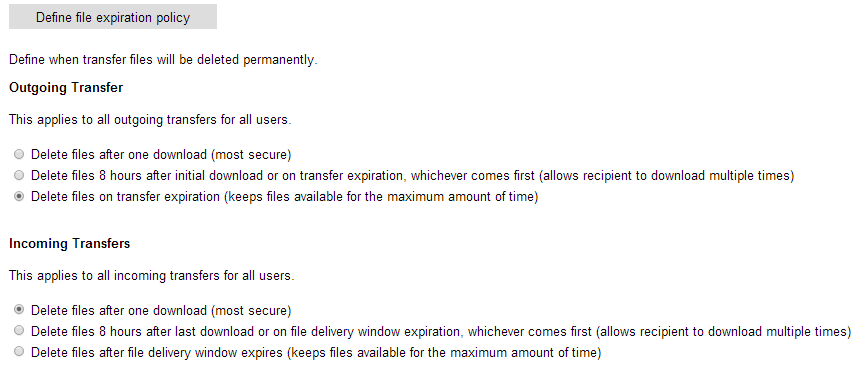
File Expiration Policy - Define when files are permanently deleted from LeapFILE's servers - Set separate policies for outgoing and incoming transfers - Choose from: immediately after download, after X days, or never expire
Incomplete Transfer Notifications - Enable alerts for transfers that haven't been fully downloaded - Set the number of days before notification is sent
Transfer Archiving - BCC all transfer notifications to a specified email address - Useful for compliance and record-keeping - Archived copies include all transfer details and notifications
Note
File Expiration Policy changes only apply to future transfers, not existing ones.
Security & Authentication
Receiver Authentication Options
Choose which authentication methods senders can use:
- Email and access code: Recipient enters email and unique code (most secure)
- Security question: Recipient answers a custom question
- Email only: Recipient enters only their email address
- No authentication: Files accessible via link alone (least secure)
Default Receiver Authentication - Set the default authentication method for all new transfers - Users can override this when sending individual transfers
Upload Security - Require registered guest accounts to send files to your users - Prevents spam and unauthorized uploads - Recommended for organizations with strict security policies
Email Verification Policy (New as of July 2025) - By default, external senders must verify their email address - Disable verification to allow unverified uploads - Recipients will see a warning if sender is unverified
Standard Security Questions
Create a list of pre-defined security questions for senders to choose from:
- Scroll to Create standard security questions
- Enter your questions (e.g., "What is our project code?", "What city is our office located in?")
- Click Save
Users can then select from these questions when sending files.
Password Policy - Set password expiration periods for all user accounts - Force password changes every 30, 60, 90, or more days - Enhance security by requiring regular password updates
Inactive Account Policy - Automatically disable user accounts after a specified period of inactivity - Reduce security risk from dormant accounts - Access via Account → Account Setup → Disable inactive accounts policy to configure the number of days of inactivity before accounts are automatically disabled
Content & Feature Management
Secure File Transfer Site URL
- Change your company's LeapFILE URL
- Format: https://yourcompanyname.leapfile.com or https://yourcompanyname.leapfile.net
- Contact support if you need to update this
Message Footer - Create a standard HTML footer for all outgoing transfer notifications - Add disclaimers, contact information, or branding - Appears at the bottom of every transfer notification email
Feature Enablement
Enable or disable major features for all users:
- Repositories: Toggle internal file storage feature on/off
- Portals: Toggle external guest portal feature on/off
When disabled, users will not see the Repositories or Portals links in the top menu.
Tip
Use feature enablement to simplify the interface for users who don't need these advanced features.
Branding & Secure File Exchange
Customize the appearance of your public file exchange website (https://yourcompanyname.leapfile.net).
Preview Your Changes
Click the Preview button at any time to open a live preview of your site in a new browser window.
General Configuration
Initial Page
Choose the default page visitors see when they visit your LeapFILE URL:
- Home: Welcome page with general information
- Upload page: Direct to the upload form
- Portal page: Direct to portal login
- Download page: Direct to download tracking
Site Footer
Choose between two footer styles:
- Minimal: "Copyright ©2007 LeapFILE. All rights reserved."
- Complete: Includes links for Employee Login, Privacy Policy, and Security Statement
Powered By LeapFILE
Choose how the LeapFILE badge appears:
- Text only: Small text badge
- Small logo: Graphical badge with logo
Home Page Title
The first line of text shown below your company's logo or name. Example: "Secure File Transfer Portal"
Home Page Welcome Message
Edit the welcome message with rich HTML formatting:
- Change font, color, and size
- Add bullet points and numbered lists
- Insert links and images
- Use the built-in WYSIWYG editor
Portal Page Customization
Portal Page Title - Customize the heading for the portal login page
Portal Message Area - Add custom HTML content to the portal page - Provide instructions for guest users - Include contact information or support links
Guest User Designation - Customize the label for external users (default: "Guest")
Upload Page Customization
Upload Page Title - Customize the heading for the secure upload page
Upload Message Area - Add custom instructions for external users uploading files - Include file type restrictions or guidelines - Format with HTML for emphasis
File Type Filtering Workaround
LeapFILE doesn't have built-in file type restrictions, but you can add a warning to your Upload page:
<b style="color:red;">We only accept .pdf and .docx files.
All other formats will be rejected.</b>
Default Upload Settings
Configure the default upload flow:
- Prompt for recipient email address
- Provide a directory of users
- Direct to specific portal or repository
Download Page Customization
Download Page Title - Customize the heading for the download page
Download Message Area - Add custom HTML content to the download page - Provide instructions for recipients - Include support contact information
Remember to Save
You must click Save in each section for changes to take effect. Changes are not saved automatically.
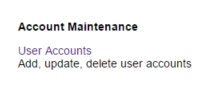
Account Maintenance: User Accounts
Manage all users in your LeapFILE account.
Adding Users
Add a Single User:
- Go to Account → User Accounts
- Click the Add User button
- Complete the required fields:
- Name
- Email address (becomes the username)
- Initial password
- Set permissions (see below)
- Click Save or Save & Add another
Import Multiple Users:
- Go to Account → User Accounts
- Click the Import Users button
- Download the CSV template
- Fill in user information in the CSV file
- Upload the completed CSV
- Choose import options:
- Add new users only
- Update existing users
- Disable users not in the file
- Delete users not in the file
User Permissions
When adding or editing a user, you can grant the following permissions:
- Administer account: Full administrator access to all account settings
- Send files / Receive files: Ability to send and receive transfers
- Create repositories / Create portals: Ability to create new repositories or portals
- Manage portal guest users: Ability to create and manage guest accounts
- View account reports: Access to reporting features
- Manage account setup: Ability to modify account configuration
Administrator Permissions
Grant administrator access only to trusted users. Administrators can modify all account settings, manage users, and access billing information.
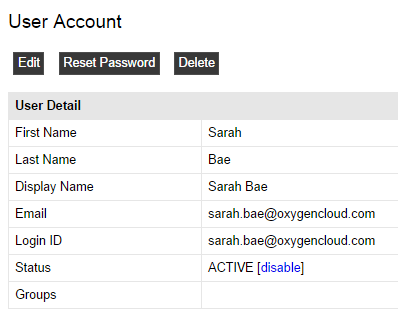
Editing Users
To modify an existing user:
- Go to Account → User Accounts
- Click the user's name
- Click Edit
- Update information or permissions
- Click Save
Enabling/Disabling Users
Disable a User:
- Go to Account → User Accounts
- Click the user's name
- Click the Disable button at the top
Enable a User:
- Go to Account → User Accounts
- Click the disabled user's name
- Click the Enable button
Bulk Enable/Disable:
- Select multiple users using checkboxes
- Click the Enable or Disable button at the top of the list
Info
Disabled users do not count toward your user limit and cannot log in to their accounts.
Resetting Passwords
To reset a user's password:
- Go to Account → User Accounts
- Click the user's name
- Click Reset Password
- A randomly generated temporary password will be emailed to the user
Note
For security reasons, administrators cannot see user passwords. The reset password function generates a new temporary password that the user must change upon first login.
Searching and Filtering Users
Use the search box to find specific users by:
- Name
- Email address
- Status (active/disabled)
Reports
Administrators have access to comprehensive reporting features.
Capacity Utilization
View storage usage:
- Total account storage capacity
- Currently used storage
- Available storage
- Usage by user (if applicable)
Use this report to monitor storage limits and plan for capacity expansion.
Transfer Utilization
See transfer bandwidth usage:
- Current month's transfer volume
- Past transfer history
- Filter by month
- Filter by user
Use this report to understand transfer patterns and identify heavy users.
Transfers in Progress
View all currently pending transfers:
- Sender and recipients
- File names and sizes
- Upload/download status
- Expiration dates
Use this report to monitor active transfers and identify potential issues.
Transfer History
Complete audit trail of all transfers:
- Filter by date range
- Filter by status (completed, expired, canceled)
- Filter by user
- View detailed delivery tracking
- Access full audit trails
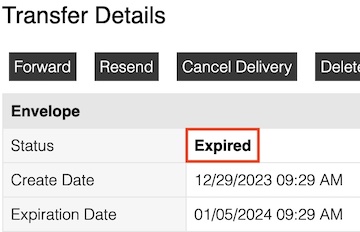
Viewing Transfer Details:
- Click details next to any transfer
- View:
- Sender and recipients
- File list
- Download status for each recipient
- Authentication method used
- Expiration date
- Full activity log
Use this report for compliance, auditing, and troubleshooting.
User Access Log
Monitor user login activity:
- User name and email
- Login date and time
- IP address
- Login method (web, desktop client)
Use this report to:
- Verify user activity
- Identify suspicious logins
- Track access patterns
- Comply with security audits
Desktop Client Management
Configure desktop client settings for all users.
Centralized Configuration
Administrators can configure:
- Default proxy settings for all users
- Default transfer options
- Automatic update policies
- Connection timeouts
Deployment
For enterprise deployments:
- Download the desktop client installer
- Deploy via software management tools
- Pre-configure settings via Group Policy or registry
- Distribute to all Windows workstations
Billing
Billing History
View past billing activity:
- Invoice dates and amounts
- Payment method used
- Billing period covered
- Download invoices (PDF)
Available for accounts billed to a credit card.
Credit Card Information
Update payment information:
- Go to Account → Billing → Credit Card Information
- Enter new card details
- Click Save
Administrator Access Required
Only administrators can view and update billing information.
For billing questions, contact: billing@leapfile.com
Managing Disabled Accounts
Why Accounts Get Disabled
User accounts may be disabled due to:
- Automatic inactivity policy (set by administrator)
- Manual disabling by an administrator
- Suspended billing or expired subscription

Re-enabling a User Account
Security Policy
For security reasons, LeapFILE support cannot enable accounts. This must be done by an account administrator.
To re-enable a user:
- Navigate to Account → User Accounts
- Click the name of the disabled user
- Click the Enable button
Preventing Automatic Disabling
To adjust the inactivity policy:
- Go to Account → Account Setup
- Scroll to Disable inactive accounts policy
- Adjust the inactivity period or disable the feature
- Click Save
Best Practices for Administrators
Security
- Regular Audits: Review user access and permissions quarterly
- Strong Password Policy: Enforce password expiration (90 days recommended)
- Inactive Account Policy: Enable automatic disabling after 90-180 days of inactivity
- Monitor Reports: Check User Access logs for suspicious activity
- Limit Administrator Access: Grant admin permissions only to necessary users
User Management
- Consistent Naming: Use a standard format for user names (e.g., "First Last")
- Email as Username: Always use email addresses as usernames
- Document Guest Accounts: Keep a record of all guest accounts and their purposes
- Regular Cleanup: Remove disabled users that are no longer needed
- Onboarding Process: Create new accounts before employee start dates
Configuration
- Clear Branding: Customize your file exchange site to match your company branding
- Helpful Instructions: Add clear instructions to upload and download pages
- Reasonable Expiration: Set default expiration to 7-14 days for most organizations
- Appropriate Authentication: Choose security levels that balance convenience and security
Reporting
- Monthly Reviews: Review transfer and capacity utilization monthly
- Trend Analysis: Track usage trends to predict future needs
- Compliance Documentation: Archive reports for audit and compliance purposes
- User Education: Share reports with heavy users to encourage efficient practices
Troubleshooting Common Admin Issues
Users Can't Send Files
Check: - User has "Send files" permission enabled - Account hasn't exceeded transfer quota - User's account is active (not disabled) - Transfer policies aren't too restrictive
Guests Can't Access Portals
Check: - Guest account exists under Portals → Guest Accounts - Guest is assigned to the portal under Guest Access - Guest is using the correct credentials - Portal feature is enabled in Account Setup
Branding Changes Don't Appear
Check: - You clicked Save after making changes - You cleared your browser cache - You're viewing the correct URL (company domain, not session URL) - Preview mode is working correctly
Reports Show No Data
Check: - You have the correct date range selected - Users have actually been active during that period - You have "View account reports" permission - Report hasn't exceeded data limits (try narrower date range)
Video Tutorials
Watch administrator tutorial videos:
Next Steps
- Learn about Portals & Repositories to manage permanent file storage
- Review the FAQ for common administrator questions
- Check the Troubleshooting guide for additional help
Support
For administrator support:
- Email: support@leapfile.com
- Billing Questions: billing@leapfile.com
- Documentation: This site
- Video Tutorials: LeapFILE Vimeo Channel