Desktop Client & Outlook Plugin
The Leapfile Desktop Client and Microsoft Outlook Plugin provide enhanced file transfer capabilities directly from your Windows desktop and email client.
Using New Outlook, Outlook on the web, or Outlook for Mac?
The classic plugin covered in most of this guide is part of the Windows Desktop Client and works only with classic (desktop) Outlook on Windows. If you use New Outlook, Outlook on the web, or Outlook for Mac, see the Web Add-in for New Outlook, Mac, and Web section below. It does not require the Windows desktop client.
Key Features & Benefits
- Transfer Large Files: Send files of any size (2GB+), bypassing restrictive email attachment limits
- Secure Transfers: All transfers are protected with end-to-end encryption
- Integrated Workflow: Send files directly from your desktop (via right-click) or from within Microsoft Outlook
- Reliability: Pause, resume, and recover file transfers, ensuring large files are sent successfully even with intermittent network connectivity
- Automation: Utilize the command-line interface for scripting and automating recurring transfers
System Requirements
- Operating System: Windows 7 SP1 or later (Windows 8, 10, 11)
- Prerequisites: .NET Framework 4.8 (included with current Windows 10 and 11)
- Outlook Plugin: Microsoft Outlook 2003 or later (32-bit or 64-bit)
Installation
Before You Begin
Close all Microsoft Office applications (Outlook, Word, Excel, etc.) before starting the installation.
Step 1: Download the Installer
- Log in to your Leapfile web account
- Click Download the latest Leapfile Desktop Client with Outlook Plug-in
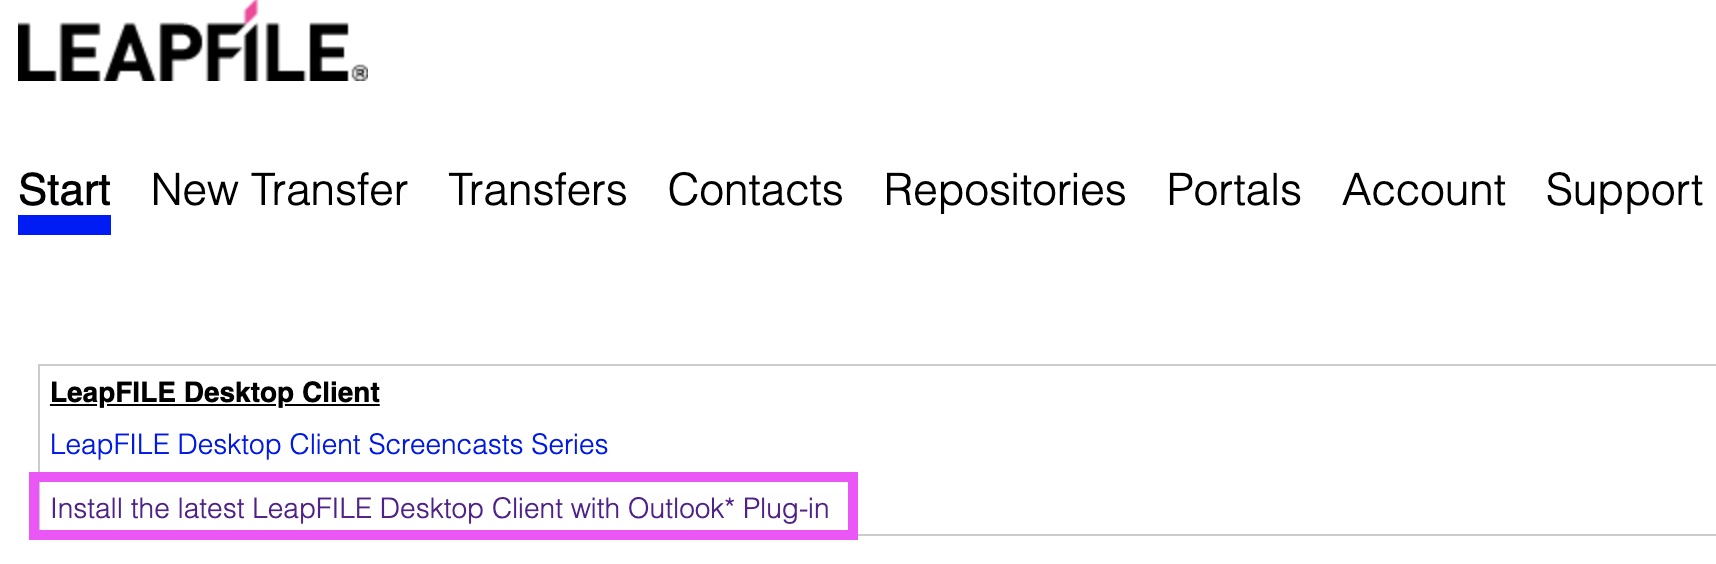
Step 2: Run the Installer
- Run the downloaded installer
- Follow the installation prompts
- After installation, the client will prompt you to log in
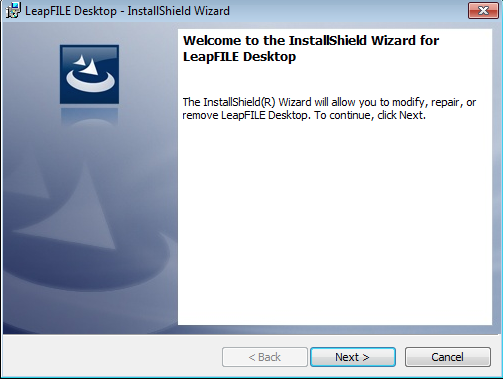
Step 3: Log In to Leapfile
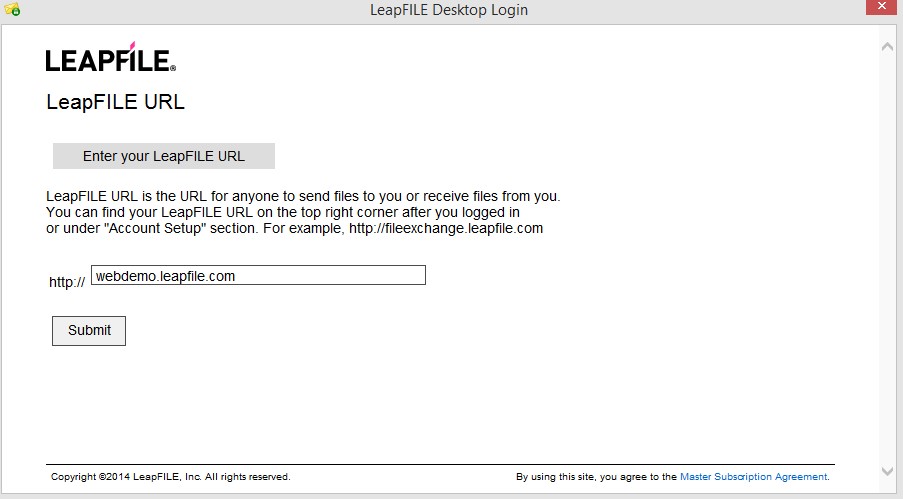
- Enter your Leapfile URL (e.g.,
yourcompany.leapfile.net) - do not includehttp://orwww - Enter your email address and password
- Click Login
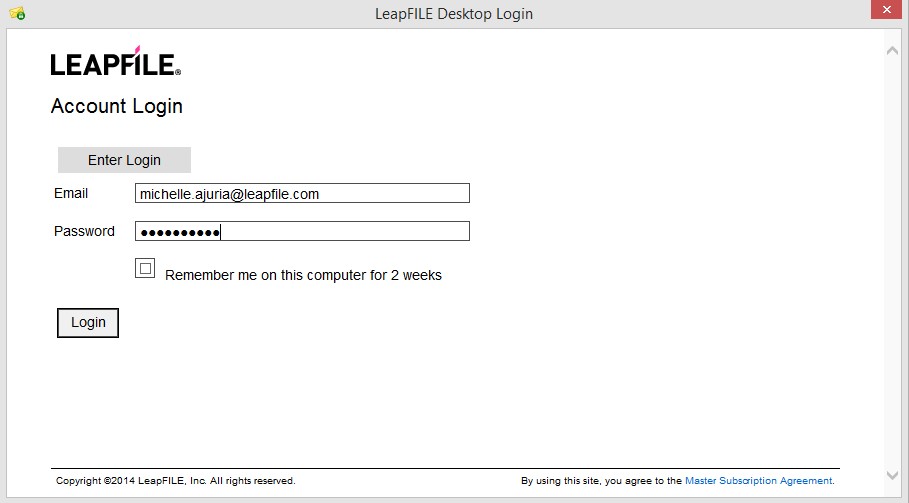
Once logged in, the desktop client will run in your system tray. You can now close the login window and proceed to install the Outlook plugin if needed.
Step 4: Start the Outlook Plugin
The Outlook plugin is part of the desktop client installer, for both 32-bit and 64-bit Outlook. There is no separate plugin download or install step.
- Make sure the desktop client installation has fully completed
- Launch Outlook
- Look for the Leapfile buttons on the Outlook ribbon when composing a message
Determining Your Outlook Version
To check if you're using 32-bit or 64-bit Outlook:
- Open Outlook
- Go to File → Office Account → About Outlook
- Look for "32-bit" or "64-bit" at the top of the About window
The single desktop client installer covers both, so either way there is nothing extra to install.
.NET Framework Requirement
The desktop client requires .NET Framework 4.8, which is included with current versions of Windows 10 and 11. If the installation fails and mentions ".NET Framework," download and install .NET Framework 4.8 from Microsoft's official download page, then retry the Leapfile installation.
Note
An internet connection is required to download the .NET Framework installer.
Using the Desktop Client
After installation, the Leapfile Desktop Client runs in your system tray (the icon area by your clock).
System Tray Menu
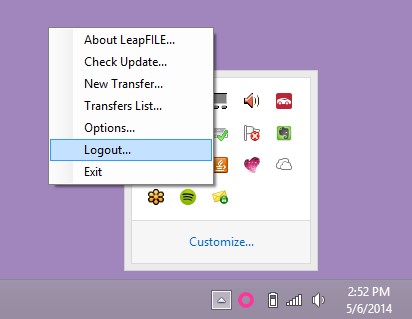
Right-click the Leapfile icon in your system tray to access:
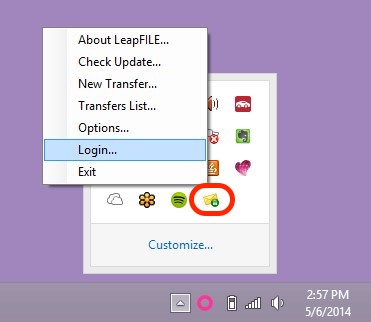
- New Transfer: Send files directly from your desktop
- Transfers List: View the status of all recent transfers
- Options: Configure client settings
- Check Update: Check for software updates
- Logout/Login: Change accounts or re-authenticate
- Exit: Close the application completely
Sending Files from Desktop
To send files directly from your desktop:
- Right-click the Leapfile system tray icon
- Select New Transfer
- Add recipients, subject, and message
- Select files to send
- Click Send
You can also drag and drop files into the transfer window.
Viewing Transfer Status
To check if a transfer succeeded or failed:
- Right-click the Leapfile system tray icon
- Select Transfers List
- View the status of all recent transfers
Tip
Always check the Transfers List after sending to verify successful completion.
Desktop Client Options
Access advanced settings by right-clicking the system tray icon and selecting Options:
General Tab
- Manage automatic software updates
- Configure startup behavior
Transfer Tab
- Adjust upload acceleration settings
- Set default security options
- Configure default expiration periods
Connection Tab
- Configure proxy settings if you're behind a corporate firewall
- Set connection timeout values
Using the Outlook Plugin
Once installed, the Leapfile plugin integrates directly into Microsoft Outlook.
Sending Files via Outlook
When composing a new email with attachments:
- Add recipients to the To field (do not use CC or BCC)
- Attach files as you normally would
- Click the Send via Leapfile button instead of the normal Send button
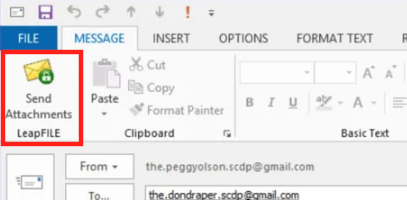
Recipient Placement
Be sure all recipients are in the To field. Leapfile will automatically BCC all recipients for security and privacy.
Configuring the Outlook Plugin
Click the LF Options button in the Outlook ribbon to configure behavior:
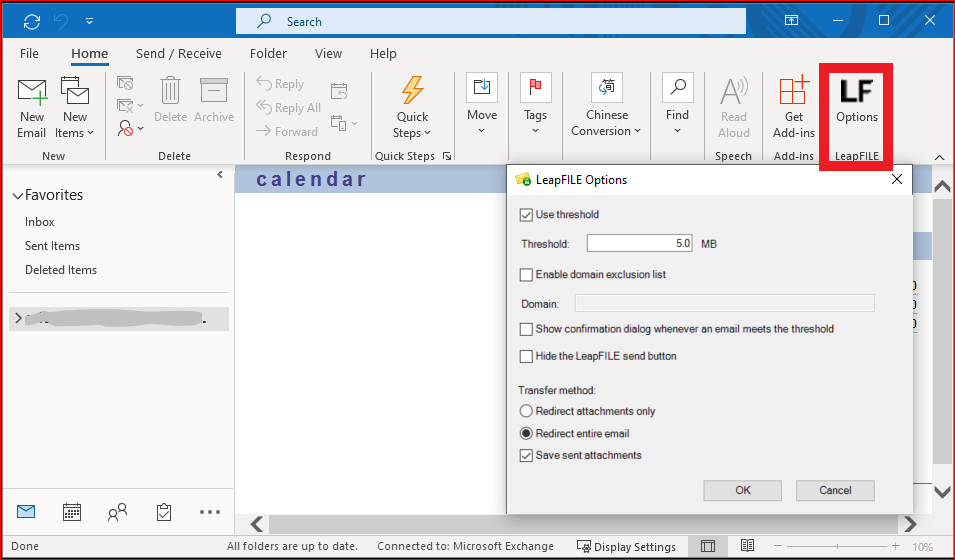
Use Threshold
Automatically send attachments via Leapfile if they exceed a certain size:
- Default: 5 MB
- Customize: Increase or decrease the threshold
- Disable: Uncheck the box to make all Leapfile transfers manual
Enable Domain Exclusion List
Specify email domains to which you never want to send files via Leapfile (e.g., internal company domains).
Redirect Entire Email
By default, only attachments are sent via Leapfile. Check this option to send the entire email body and attachments through Leapfile for maximum security.
Adding a Leapfile Link to Your Email Signature
Make it easy for contacts to send you files by adding a link to your email signature:
- In Outlook, go to File → Options → Mail → Signatures
- Select the signature you want to edit
- Type the text for your link (e.g., "Click here to send me files securely")
- Select the text and click the Hyperlink button
- In the address field, enter your Leapfile URL (e.g.,
https://yourcompany.leapfile.net) - Click OK to save
Organizing Leapfile Notifications in Outlook
Create a dedicated folder for Leapfile email notifications to keep your inbox organized:
- Create a new folder in Outlook (e.g., "Leapfile Notifications")
- Open any email from
no_reply@leapfile.com - Go to Message → Rules → Create Rule
- Check the From [sender] checkbox
- Check Move the item to folder
- Select your Leapfile folder
- Click OK
All future Leapfile notifications will automatically move to this folder.
Web Add-in for New Outlook, Mac, and Web
If you use New Outlook on Windows, Outlook on the web, or Outlook for Mac, you can send large files through Leapfile with our web-based add-in. It works a little differently from the classic desktop plugin above:
- Nothing to download. The add-in is added to your Outlook account from Outlook's own app store, and it updates automatically.
- Works everywhere you sign in. It is tied to your Outlook account rather than one computer, so it follows you to every device where you use New Outlook, including Mac.
Installing the Web Add-in
You install the add-in from inside Outlook:
- In Outlook, click More apps (the grid icon at the bottom of the left sidebar), then Add apps.
- Search for Leapfile and open the listing for your account.
- Click Add and accept the requested permissions. Outlook confirms when the add-in is installed.
Pick the right listing
You may see more than one Leapfile listing in the store, and only the one for your account will work. To find the exact name, sign in to your Leapfile account, open the Start tab, and click Install Leapfile for Outlook. That page names the exact listing to choose. If you do not see the add-in option there, contact your Leapfile administrator or our support team.
If you install the wrong listing, you find out at sign-in rather than at install time. See Troubleshooting the Web Add-in below.
For IT administrators
You can deploy the Leapfile add-in centrally to specific users, groups, or your whole organization from the Integrated Apps page in the Microsoft 365 admin center. No per-user installs are needed.
Sending Files with the Web Add-in
- Start a new email and click the Leapfile button in the ribbon (or from the Apps menu) to open the Leapfile panel.
- The first time, click Connect and sign in to your Leapfile account. After that, the add-in reconnects automatically. If this is your first sign-in to Leapfile and your account uses single sign-on, we email you a six-digit code and ask for it on a confirmation page — enter it and the sign-in continues. That confirms your email address, and you are only asked once.
- A preview card appears in the message body, marking where your secure download links will go.
- Click Add files to upload. Uploads run securely in the background, so you can keep writing your message while they finish.
- When you are ready, send the email. Leapfile finalizes the upload and replaces the preview with secure download links.
Your recipient gets a download button, confirms their identity with a verification code, and can download the files until the transfer expires.
Let uploads finish before sending
Give your files time to finish uploading before you send. If you send while an upload is still in progress, Outlook will pause and prompt you to wait. Also, do not delete the preview card in your message. It tells Leapfile where to place your links. If you remove it by accident, click Reattach to restore it.
Troubleshooting the Web Add-in
"You need a different Leapfile add-in"
Cause: Leapfile runs on more than one server, and each server has its own add-in listing in the Outlook store. You installed a listing served by one server, but the account for the email address you entered lives on another one. The add-in you have cannot sign that account in.
Solution: The page includes a Get the right add-in button. It opens the install page for the server your account is on, in a new browser tab. Install the add-in it offers, then remove the one you added by mistake. If you meant to use a different address, click Use a different email to go back and enter another one.
A file shows as Failed
Cause: The file's upload did not complete, so there is nothing for Leapfile to link to. The two usual causes are:
- The message sat too long before you sent it. An upload is held for 24 hours from the time it starts. After that it is cleaned up, and finishing the send finds nothing there.
- The upload was cancelled. Removing the file, or closing the panel before the upload finished, ends it.
Solution: Remove the failed row, add the file again, and wait for it to reach 100% before you send. If you plan to leave a draft for more than a day, add the files when you are ready to send it rather than in advance.
Note
Leapfile will not send while a file is in a failed state. If you click send, the panel tells you that some uploads did not finish and asks you to retry or remove them first.
Ask Leapfile (in-product AI assistant)
The latest Leapfile Desktop Client ships with a built-in AI assistant: 🤖 Ask Leapfile in the tray menu (right-click the Leapfile icon to find it).
Ask Leapfile can:
- Answer questions about how Leapfile works
- Help troubleshoot desktop client and Outlook plugin issues
- Read your local Leapfile logs to diagnose problems on your machine
- Perform actions on your local client on your behalf — so you don't have to dig through tray menus or settings dialogs to get things done
When you click Ask Leapfile, it opens its own window where you can chat with the assistant directly. The assistant will tell you what it can and can't do — if you're not sure whether it can help with something, just ask.
For most desktop client and Outlook issues, Ask Leapfile is the fastest way to get help.
Troubleshooting
Common Errors
Error: Invalid Login / Invalid APIKey
Cause: This usually happens after you've changed your Leapfile password.
Solution:
- Right-click the Leapfile icon in the system tray and select Logout
- Right-click the icon again and select Login
- Enter your new password
Error: Authentication Option is Currently Disabled
Cause: Your account administrator has disabled a specific security option.
Solution:
- Right-click the Leapfile icon and choose Exit
- Relaunch the application from the Start Menu to sync the latest settings
- Alternatively, contact your administrator to re-enable the option under Account Settings → Transfer → Downloaders
Error: Unable to Connect / "Establishing Authentication Session"
Cause: A firewall, proxy, anti-virus, or web filter is blocking the client.
Solution: Contact your IT department and ask them to whitelist:
- Executables:
LeapFILEDesktopClient.exeandLeapFILEComHub.exe - Port: 443 (HTTPS)
- Domains: allow both
*.leapfile.netand*.leapfile.com. Common hosts areapi.leapfile.netandfileexchange.leapfile.net. Which domain your account uses depends on its Leapfile service (some services use.leapfile.net, others.leapfile.com), so allow both wildcards to be safe. - IPs:
54.227.253.124and174.129.208.74
You can test connectivity by visiting the following (or your service's .leapfile.com equivalent):
- https://api.leapfile.net/services/rest
- https://fileexchange.leapfile.net/services/rest
A blank page indicates successful connection.
Error: Waiting for Leapfile ComHub to Start Timed Out
Cause: The Leapfile service is stopped or blocked by another application.
Solution:
- Check your antivirus settings - ensure
LeapFILEComHub.exeandLeapFILEDesktopClient.exeare not blocked - Open services.msc (press Windows+R, type
services.msc, press Enter) - Find Leapfile ComHub Service
- Set Startup type to Automatic
- Configure Recovery options to restart the service on failure
- Reboot your computer
If the issue persists, uninstall completely (including registry keys) and reinstall.
Outlook Plugin Missing or Disabled
If the Leapfile button doesn't appear in Outlook:
- Go to File → Options → Add-ins
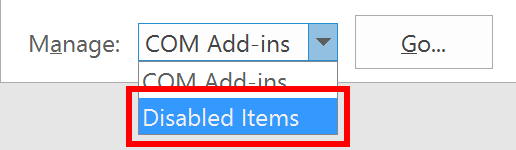
- At the bottom, select COM Add-ins from the dropdown and click Go
- Check the Leapfile Add-in box
- Click OK and restart Outlook

If the add-in appears in Disabled Items:
- Select Disabled Items from the dropdown and click Go
- Select the Leapfile Add-in and click Enable
- Restart Outlook
Error: Redemption.dll Not Registered (64-bit Plugin)
Cause: Outlook launched before the 64-bit plugin installation completed.
Solution:
- Close all Office applications
- Uninstall both Leapfile Desktop and x64 add-in from Apps and Features
- Delete installation folders:
C:\Program Files (x86)\LeapFILEC:\Program Files\LeapFILE- Delete the Add-in Express folder from Documents
- Delete
C:\Users\<username>\AppData\Roaming\LeapFILE - Delete registry keys (use caution):
HKEY_CURRENT_USER\Software\LeapFILEHKEY_LOCAL_MACHINE\Software\LeapFILEHKEY_LOCAL_MACHINE\Software\WOW6432node\LeapFILE- Repair Microsoft Office using the official tool: aka.ms/diag_officeuninstall
- Reinstall Leapfile Desktop Client
- Immediately install the 64-bit add-in
- Launch Outlook
Finding Log Files
If support asks for log files, you can find them here:
- LFComHubLog.txt:
C:\Program Files (x86)\LeapFILE\LeapFILE Desktop\Log\ - LFDesktopClientLog.txt:
C:\Users\<username>\AppData\Roaming\LeapFILE\Log\


Viewing Hidden Files
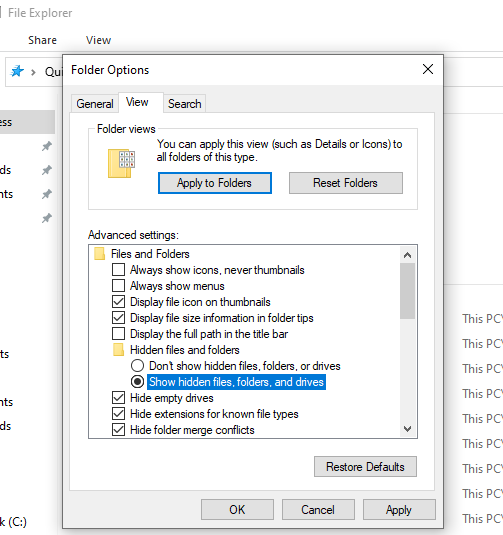
The AppData folder is hidden by default. To view it:
- Open File Explorer
- Go to View → Options → Change folder and search options
- Click the View tab
- Select Show hidden files, folders, and drives
- Click OK
Send these files to support@leapfile.com when requested.
Uninstalling the Desktop Client
To completely remove the Leapfile Desktop Client:
- Close all Office applications
- Go to Control Panel → Programs and Features (or Settings → Apps)
- Uninstall Leapfile Desktop Client
- Delete the Leapfile folder from
C:\Program Files (x86)\ - Delete the Add-in Express folder from Documents
- Delete
C:\Users\<username>\AppData\Roaming\LeapFILE - Delete registry keys (optional but recommended):
HKEY_CURRENT_USER\Software\LeapFILEHKEY_LOCAL_MACHINE\Software\LeapFILEHKEY_LOCAL_MACHINE\Software\WOW6432node\LeapFILE
Registry Editing
Exercise caution when editing the Windows registry. Incorrect changes can cause system issues. See Microsoft's registry editing guide for more information.
Advanced Features
Command-Line Automation
For IT administrators and advanced users, you can automate file transfers using the command-line interface.
Prerequisites: Leapfile Desktop Client must be installed and you must be logged in.
Basic Usage:
cd "C:\Program Files (x86)\LeapFILE\LeapFILE Desktop"
LeapfileCmd.exe -t"recipient@example.com" -s"Subject" -m"Message" -f"C:\path\to\file.pdf"
Parameters:
- -t: Recipients (comma-separated)
- -s: Subject
- -m: Message
- -f: File paths (comma-separated)
PowerShell Example:
cd "C:\Program Files (x86)\LeapFILE\LeapFILE Desktop"

$RecipientList = "user1@example.com,user2@example.com"
$Subject = "Automated Report"
$MessageBody = "Here is the daily report."
$Attachment = "C:\reports\daily_report.pdf"

./LeapFILECmd.exe -t"$RecipientList" -s"$Subject" -m"$MessageBody" -f"$Attachment"
You can schedule this script as a Windows Task for full automation.
Video Tutorials
Watch video guides for the desktop client and Outlook plugin:
Next Steps
- Learn about Portals & Repositories for permanent file storage
- Explore Administrative Features if you're an account administrator
- Check the FAQ and Troubleshooting guides for more help