Portals & Repositories
Portals and Repositories provide secure, permanent file storage spaces. Unlike regular file transfers that expire, files stored in Portals and Repositories remain available indefinitely.
Feature Availability
The availability of Portals and Repositories depends on your LeapFILE service plan. If you don't see these options in your account, contact your account administrator or LeapFILE support to inquire about enabling these features.
Understanding the Difference
Repositories
For sharing files among internal users within your organization.
- Access controlled by administrators
- Users see only repositories they have permission to access
- Perfect for team collaboration and shared workspaces
- Files stored permanently (no expiration)
Portals
For sharing files with external guests like clients, vendors, or partners.
- Guest accounts created and managed by administrators
- Guests access via your company's LeapFILE URL
- No LeapFILE account required for guests
- Files stored permanently (no expiration)
Setting Up a Repository
Step 1: Create the Repository
- Log in to your LeapFILE account
- Click Repositories in the top menu
- Click Add Repository
- Enter a name and description
- Click Save
Note
If you don't see the Repositories link in the top menu, this feature may be disabled for your account. Contact your administrator to enable it under Account → Account Setup → Feature Enablement.
Step 2: Add Files and Folders
- Click the File Explorer icon next to your repository name
- Click Add Files to upload individual files
- Click Add Folder to upload entire folders
- Use drag-and-drop to add multiple files at once
Step 3: Manage User Access
Control who can access the repository:
- Under the repository name, click User Access
- Click Add User
- Select users from your account
- Grant appropriate permissions:
- Read: View and download files only
- Write: Upload, modify, and delete files
- Admin: Full control including user management
- Click Save
Repository Operations
Downloading Files
To download a file:
- Open the repository
- Click on a file to view details
- Click the Download button
Sending Files from a Repository
To send files stored in a repository as a transfer:
- Open the repository
- Select files using the checkboxes
- Click the Send button at the bottom
- Add recipients and send as a normal transfer
Downloading All Files as a Zip
To download the entire repository:
- Open the repository
- Check the Select All checkbox at the top
- Click the Send button
- Send the transfer to yourself
- Go to Incoming Transfers to download the zip file
Deleting Files
To remove files from a repository:
- Select files/folders using checkboxes
- Click the Delete button
- Confirm the deletion
Warning
Deleted files cannot be recovered. Ensure you have backups before deleting.
Setting Up a Portal
Step 1: Create the Portal
- Log in to your LeapFILE account
- Click Portals in the top menu
- Click Add Portal
- Enter a name and description
- Click Save
Step 2: Create Guest Accounts
Before guests can access a portal, you must create guest accounts:
- On the Portals page, click Guest Accounts
- Click Add Guest Account
- Enter the guest's information:
- Name: Guest's full name
- Email or Username: Email address recommended (allows password reset)
- Password: Set an initial password
- Click Save
Guest Notification
No notification email is sent to guests automatically. You must manually inform guests about:
- Your company's LeapFILE URL
- Their username and password
- How to access the portal
Step 3: Assign Guest Access to the Portal
- Under the portal name, click Guest Access
- Click Add Guest
- Select the guest accounts you created
- Click Save
Step 4: Inform Your Guests
Send your guests the following information:
LeapFILE Portal Access

URL: https://yourcompany.leapfile.net
Username: [their email or username]
Password: [their password]

Instructions:
1. Go to the URL above
2. Click "File Portals"
3. Log in with your username and password
4. Access the portal: [portal name]
Guest Access Process
When guests visit your LeapFILE URL:
- They click File Portals at the bottom of the page
- Enter their username and password
- View only the portals they have permission to access
- Download files, but cannot upload directly to the portal
Guest Upload Limitations
Guests cannot upload files directly to portals to prevent accidental file deletion or overwrites. Instead, guests should send a regular transfer to a user, who can then copy the files into the portal.
Uploading Files to Portals/Repositories
Method 1: Via Web Interface
- Open the portal or repository
- Click Add Files or Add Folder
- Select files to upload
- Wait for the upload to complete
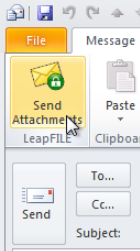
Method 2: Via Outlook Plugin (Recommended for Large Files)
The LeapFILE Desktop Client provides better performance for large uploads:
- Compose a new email in Outlook
- Address the email to yourself
- Attach the files you want to upload
- Click the Send via LeapFILE button
- Log in to your LeapFILE web account
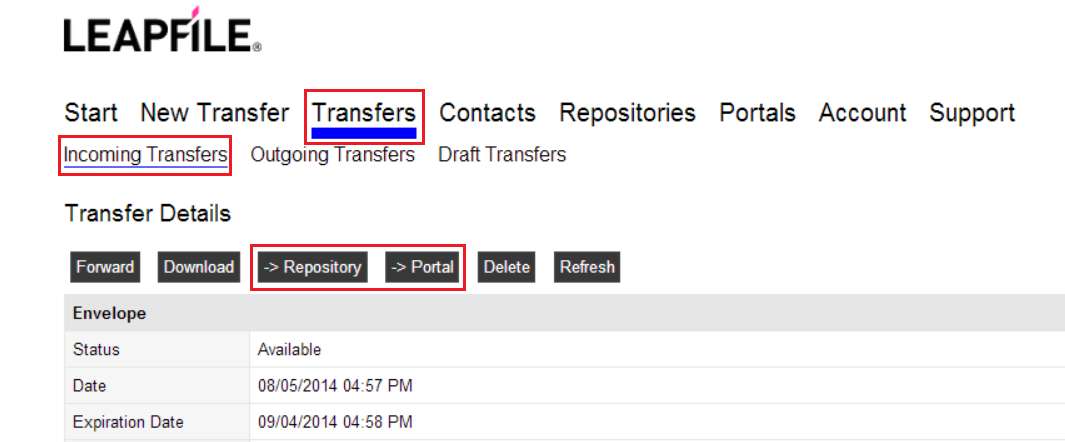
- Go to Transfers → Incoming Transfers
- Find your transfer and click → Repository or → Portal
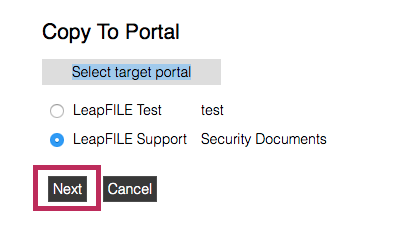
- Select the destination portal or repository
- Choose a specific folder (optional)
- Click Save
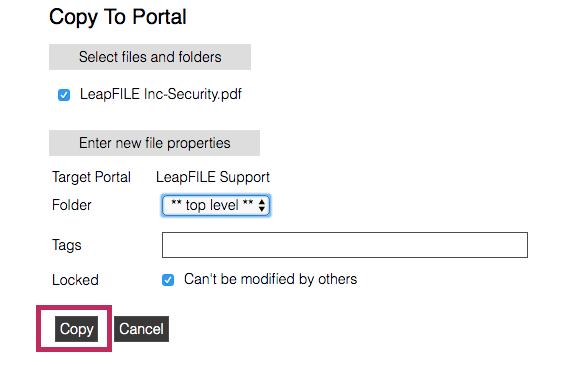
- Optionally delete the transfer after copying
Performance Tip
The LeapFILE Desktop Client is more powerful, fast, and reliable than using the web client for uploading large files to repositories or portals.
Method 3: Via Desktop Client
- Right-click the LeapFILE system tray icon
- Select New Transfer
- Send a transfer to yourself or another user
- Log in to the web client
- Go to Incoming Transfers
- Click → Repository or → Portal
- Select the destination and save
Managing Portal and Repository Content
Organizing Files
Create folders to organize content:
- Open the portal or repository
- Click Add Folder
- Enter a folder name
- Upload files into the folder
Moving Files
To move files between folders:
- Download the files
- Navigate to the destination folder
- Upload the files to the new location
- Delete the files from the original location
Searching for Files
Use your browser's search function (Ctrl+F or Cmd+F) to find specific files in the file list.
Best Practices
For Repositories
- Organize by Project: Create separate repositories for different teams or projects
- Set Clear Permissions: Grant only the access level users need (Read, Write, or Admin)
- Regular Cleanup: Periodically review and remove outdated files
- Naming Conventions: Use clear, consistent folder and file names
For Portals
- One Portal Per Client: Create dedicated portals for each external client or partner
- Document Guest Credentials: Keep a record of guest accounts and which portals they can access
- Regular Audits: Review guest access periodically and remove inactive accounts
- Clear Instructions: Provide guests with detailed access instructions
Security Considerations
Security Best Practices
- Change guest passwords periodically
- Remove access for guests who no longer need it
- Use email addresses for guest accounts (enables password reset)
- Monitor file access through the Transfer History report
Common Scenarios
Scenario 1: Sharing Files with a Long-Term Client
Use Case: You work with a client who needs ongoing access to project files.
Solution: 1. Create a portal named "[Client Name] Files" 2. Create a guest account for the client 3. Assign the guest to the portal 4. Upload project files to the portal 5. Provide the client with login credentials
Scenario 2: Team Collaboration on Internal Projects
Use Case: Your marketing team needs a shared space for campaign assets.
Solution: 1. Create a repository named "Marketing Campaigns" 2. Add all marketing team members with Write permissions 3. Add executives with Read permissions 4. Organize files by campaign name in folders
Scenario 3: Receiving Large Files from External Sources
Use Case: A vendor needs to send you large files regularly.
Solution: 1. Create a guest account for the vendor 2. Instruct them to send transfers to your email via Secure Upload 3. When transfers arrive, copy them to a portal or repository for permanent storage 4. Delete the transfer after copying to free up transfer quota
Troubleshooting
I Don't See the Repositories or Portals Link
Cause: The features are disabled in your account settings.
Solution: Contact your account administrator. They can enable these features under Account → Account Setup → Feature Enablement.
Guests Can't Log In
Cause: Incorrect credentials or guest account not assigned to the portal.
Solution: 1. Verify the guest account exists under Portals → Guest Accounts 2. Confirm the guest is assigned to the portal under Guest Access 3. Reset the guest's password if needed 4. Ensure the guest is using the correct URL (your company's LeapFILE site)
Upload Fails or is Very Slow
Cause: Large files or poor internet connection.
Solution: - Use the Desktop Client instead of the web interface - Upload files to yourself as a transfer first, then copy to the portal/repository - Check your internet connection speed - Try uploading during off-peak hours
Can't Delete Files
Cause: Insufficient permissions.
Solution: Ensure you have Write or Admin permissions for the repository or portal. Contact your administrator to grant these permissions.
Video Tutorials
Watch video guides for Portals and Repositories:
Next Steps
- Learn about Administrative Features to manage portals and repositories
- Review the FAQ for answers to common questions
- Check the Troubleshooting guide for additional help